
If you have an older Pleasantonhave polyurethane cabinets, you may wonder whether you can paint them. The good news is you can. However, the approach may differ from painting wood, vinyl, and other cabinets.
Painting over polyurethane-coated cabinets is a common concern for many homeowners looking to update their kitchen or bathroom without the expense of replacing cabinetry. Proper preparation is crucial to achieving a smooth, durable finish. Without the right steps, the paint may not adhere correctly, leading to peeling, chipping, and an overall unsatisfactory result. Ensuring the cabinets are ready for painting is the key to a successful transformation.
Understanding polyurethane coating
Polyurethane is a synthetic resin used in varnishes and coatings. It provides a durable, high-gloss finish that protects surfaces from wear, moisture, and environmental damage. It is commonly used on wood floors, furniture, and other surfaces requiring a tough protective layer.
Characteristics of polyurethane-coated surfaces
- Durability: Polyurethane creates a hard, resilient surface that resists scratches, dents, and abrasions.
- Water resistance: It forms a water-resistant barrier, making it ideal for moisture-prone areas.
- Aesthetic appeal: It enhances the natural beauty of wood with a glossy or satin finish, adding depth and richness to the surface.
Challenges of painting over polyurethane
- Adhesion issues: The slick, glossy polyurethane surface can make it difficult for new paint to adhere properly.
- Surface preparation: To paint over polyurethane, thoroughly clean the surface, sand to remove the gloss, and prime with a high-adhesion primer to ensure proper paint adhesion.
- Time-consuming: The preparation process is labor-intensive and time-consuming, requiring careful attention to detail for a successful outcome.
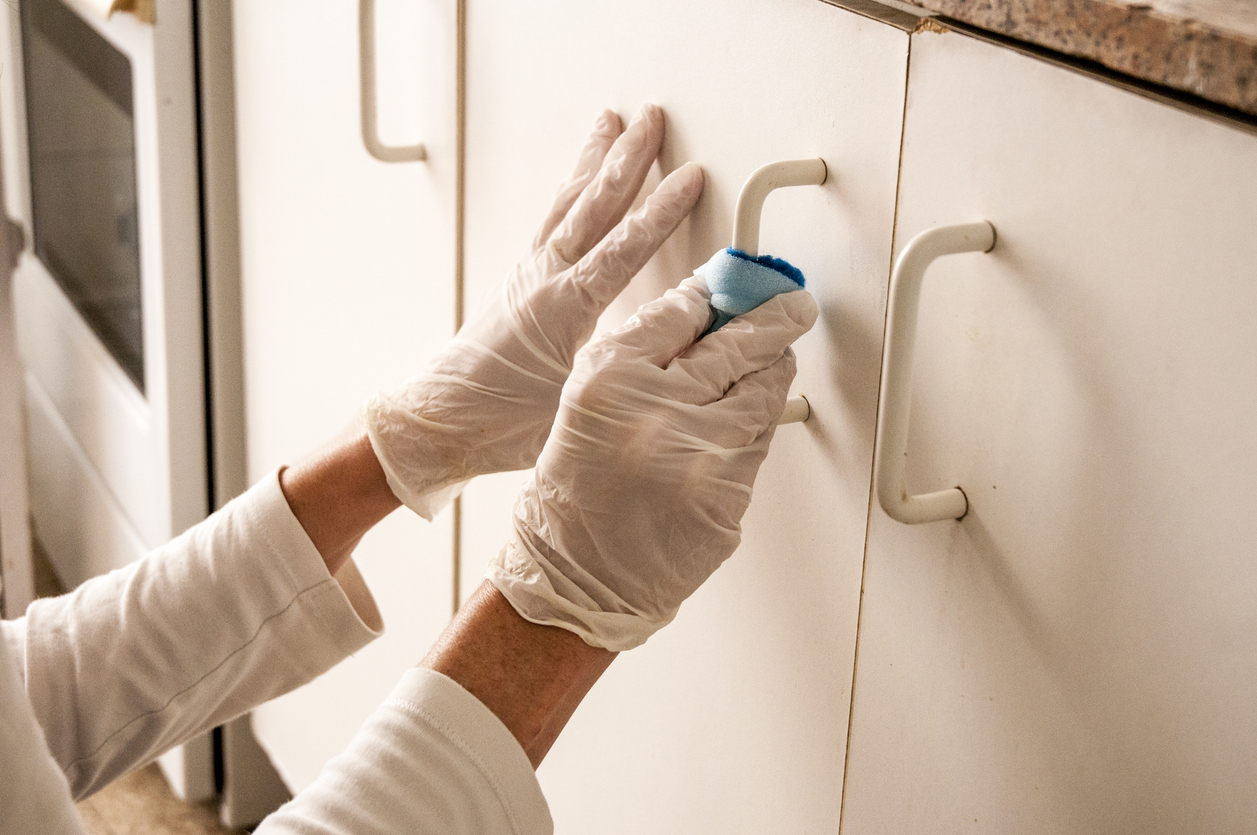
Preparing the polyurethane cabinets for painting
Materials needed:
- Dish soap or a degreasing cleaner
- Warm water
- Sponge or cloth
- Bucket
- Clean towels
Step-by-step guide:
- Mix a few drops of dish soap or a degreasing cleaner with warm water in a bucket.
- Dip the sponge or cloth into the soapy water and wring it out to avoid excess moisture.
- Wipe down all cabinet surfaces to remove grease, dirt, and grime.
- Rinse the sponge or cloth frequently and change the water if it gets too dirty.
- Once cleaned, dry the cabinets thoroughly with clean towels.
Step 2: Sanding the surface
Sanding is crucial to create a rough surface for the paint to adhere to, ensuring a long-lasting finish.
Recommended sanding tools and techniques
- Use 220-grit sandpaper to lightly scuff the surface.
- An orbital sander can speed up the process, but be careful to avoid doing this to over-sanding.
- Sand in the grain’s direction to avoid scratches.
- Wipe away dust with a tack cloth after sanding.
Step 3: Priming the cabinets
Primer provides a smooth base for paint, enhances adhesion, and ensures a uniform finish, especially on polyurethane surfaces.
Best types of primer for polyurethane surfaces:
- Shellac-based primer: Excellent adhesion and stain-blocking properties.
- Oil-based primer: Durable and good for blocking stains.
- Bonding primer: Specifically designed for glossy surfaces like polyurethane.
Application tips for even coverage:
- Stir the primer thoroughly before use.
- Apply with a high-quality brush or a foam roller for smooth application.
- Use thin, even coats to avoid drips and ensure complete coverage.
- Allow the primer to dry completely according to the manufacturer’s instructions before sanding the surface lightly with 220-grit sandpaper.
- Wipe away any dust with a tack cloth before applying paint.
Choosing the right paint
Types of paint for polyurethane cabinets
- Acrylic latex paint: Durable and adheres well to polyurethane surfaces.
- Oil-based paint: Offers a smooth finish and durability but has a longer drying time and sharp odor.
- Chalk paint: Provides a matte finish and is easy to distress for a vintage look.
Recommended brands and finishes
1. Sherwin-Williams:
- Emerald Urethane Trim Enamel: Offers a smooth finish and excellent durability.
- ProClassic Alkyd Interior Enamel: Ideal for cabinets, providing a high-quality finish.
2. Benjamin Moore:
- Advance: Known for its durability and smooth finish.
- Scuff-X: Great for high-traffic areas with excellent scuff resistance.
3. Behr:
- Urethane Alkyd Satin Enamel: Combines the best of oil and water-based finishes.
Tips for selecting the right color and finish
1. Color:
- Light colors: Make small spaces appear larger and more open.
- Neutral colors: Provide a timeless look and easily blend with various decor styles.
- Bold colors: Can create a statement but may require more maintenance.
2. Finish:
- Satin: Offers a subtle sheen and is easy to clean, making it ideal for kitchens and bathrooms.
- Semi-gloss: More reflective and durable, suitable for high-use cabinets.
- Gloss: Provides a high-shine finish but can highlight imperfections; best for modern, sleek looks.
Painting the cabinets
Step-by-Step Guide to Painting Polyurethane Cabinets
1. Preparation:
- Remove cabinet doors and hardware.
- Clean the surfaces with a degreaser to remove dirt, grease, or oils.
- Sand the cabinets lightly with fine-grit sandpaper (220-grit) to scuff the surface for better paint adhesion.
- Wipe off the dust with a tack cloth.
2. Priming:
- Apply a high-quality bonding primer suitable for glossy surfaces.
- Let the primer dry thoroughly as per the manufacturer’s instructions.
- Lightly sand the primed surface and wipe it clean.
3. Painting:
- Use a high-quality paint designed for cabinets or furniture.
- Apply the first coat of paint using a brush or roller designed for smooth finishes.
- Allow the paint to dry completely.
4. Finishing:
- Lightly sand between coats to remove any imperfections.
- Apply additional coats (typically 2-3) until the desired coverage is achieved.
- Allow ample drying time between coats.
Tips for smooth and even application
- Use quality tools: Invest in high-quality brushes and rollers designed for smooth finishes.
- Maintain a wet edge: Work in small sections and keep a wet edge to avoid lap marks.
- Thin coats: Apply thin coats of paint to prevent drips and uneven coverage.
- Consistent strokes: Use consistent brush or roller strokes in one direction.
Importance of multiple coats and drying time
- Coverage: Multiple coats ensure even color and full coverage, hiding any underlying imperfections.
- Durability: Each coat adds to the durability of the finish, protecting the cabinets from wear and tear.
- Drying time: Adequate drying time between coats prevents issues like peeling, cracking, or uneven texture. Follow the manufacturer’s recommended drying times.
Techniques for avoiding brush marks and drips
- Quality paint: Use high-quality, self-leveling paint designed for cabinetry to minimize brush marks.
- Proper loading: Load the brush or roller properly, avoiding excessive paint, which can cause drips.
- Feathering technique: Feather out the edges by lightly dragging the brush across the surface to smooth out any marks.
- Sand between coats: Lightly sand between coats to remove imperfections and achieve a smooth finish.
Finishing touches and maintenance
Final sealing options to protect the paint job
1. Polyurethane sealant:
- Water-based polyurethane: Dries quickly, has a low odor, and resists yellowing over time. Ideal for lighter-colored cabinets.
- Oil-based polyurethane: More durable than water-based, but it can yellow over time. It goes better for darker-colored cabinets.
2. Polycrylic:
- It is water-based and provides a clear finish that doesn’t yellow. It dries fast and is easy to clean up with water and soap. This sealant is best for light-colored cabinets.
3. Lacquer:
- Provides a very durable, high-gloss finish. However, it requires proper ventilation and can be more challenging to apply.
4. Wax:
- Gives a soft, hand-rubbed finish but offers less protection than other sealants. Best for low-traffic areas.
5. Shellac:
- Offers a high-gloss finish and is easy to apply, but it’s less durable and can be damaged by water and alcohol.
Tips for maintaining painted cabinets
1. Regular cleaning: Use a soft cloth and mild detergent or a solution of vinegar and water to clean the cabinets. Avoid abrasive cleaners that can scratch the surface.
2. Avoid excess moisture: Wipe up spills immediately and avoid hanging wet towels or dishcloths on the cabinets.
3. Use cabinet protectors: Install rubber bumpers on cabinet doors and drawers to prevent chipping and scratches.
4. Handle with care: Use handles or knobs to open doors and drawers to minimize direct contact with the painted surface.
5. Periodic inspection: Regularly check for signs of wear and touch up as needed to prevent further damage.
How to handle touch-ups and repairs
1. Touch-ups:
- Color match: Keep a small amount of the original paint for touch-ups. If you don’t have any left, take a cabinet door to a paint store for matching.
- Preparation: Clean the area to be touched up and lightly sand around the edges to help the new paint blend in.
- Application: Use a small brush to apply the paint in thin layers, allowing each layer to dry before applying the next.
2. Repairs:
- Filling holes and cracks: Use a wood filler to fill any holes or cracks, then sand smooth once dry. Apply primer before repainting.
- Replacing damaged sections: For larger damaged areas, you may need to replace the cabinet’s section. Once replaced, sand, prime, and paint to match the rest of the cabinet.
3. Re-sealing:
- After touch-ups and repairs, apply a fresh coat of the original sealant to protect the paint job and ensure a uniform finish.
Maintaining painted polyurethane cabinets involves regular cleaning, careful handling, and periodic touch-ups. Follow these guidelines to keep your cabinets looking fresh and well-maintained for years.
Conclusion
Painting polyurethane cabinets can be a rewarding endeavor when approached with confidence. Properly prep surfaces, use quality paint and apply multiple coats as needed to ensure a durable and beautiful finish.
For expert guidance and exceptional results, contact only the seasoned professionals from Custom Painting, Inc., and let us bring your vision to life. Call us at 925-294-8062 or use our contact form for questions or estimate requests (we always provide estimates for free upon request).
