
Introduction
Coordinating awning removal with exterior painting projects in Livermore, CA, is crucial for achieving optimal results, efficiency, and cost-effectiveness in building maintenance and renovation.
Awning removal provides painters with unobstructed access to the building’s façade, ensuring a thorough, high-quality paint job. It also reduces safety risks by removing obstacles that could interfere with scaffolding or ladders. It protects painters from paint drips, overspray, and other potential damage. This precaution helps maintain the aesthetic and functional integrity of the awnings.
Awning removal also reduces disruption and increases work efficiency. It allows painters to do the necessary cleaning, maintenance, and repairs. Furthermore, addressing any repairs or maintenance for the building’s exterior and the awnings simultaneously can prevent more significant expenses in the long run.
When removing and replacing awnings for your home, the job should be done properly the first time to ensure a successful and long-term finish. That’s why it’s always recommended that professionals like our Custom Painting, Inc. team tackle these jobs. Not only will hiring us save you time and money down the road, but we will also give you peace of mind knowing we get the job done right the first time.
Understanding the scope of your project
Assessing the condition and size of awnings for removal and preparing for a painting project involves a series of steps to ensure both tasks are completed efficiently and safely. This process helps determine the scale of the painting project, estimate costs, and identify the specific requirements needed for a successful completion. Here’s a structured approach to tackle these tasks:
Assessing awnings for removal
- Safety first – Before starting any assessment, ensure that the area around the awning is secure and that you have the necessary safety equipment, such as gloves, safety glasses, and possibly hard hats if the awnings are large or high above.
- Inspect the condition – Examine the awnings for any signs of wear and tear, damage, or rot, especially if they are made of fabric or wood. For metal awnings, look for rust, corrosion, or structural damage. The condition of the awning will affect the removal method and the precautions needed.
- Measure dimensions – Measure the length, width, and projection of the awning from the wall. These dimensions are crucial for understanding the scale of the removal task and for planning the disposal of the material. Larger awnings may require dismantling in sections.
- Check attachment points – Identify how the awning is attached to the building. Common attachment methods include bolts, screws, and in some cases, welded joints. The type of attachment will dictate the tools required for removal and the complexity of the task.
- Consider disposal—Based on the awning’s condition and material, consider your options for disposal or recycling. Some materials may be reused or sold, while others must be disposed of according to local regulations.

Planning the painting project
- Scale of the project – Use the information gathered from removing the awnings to understand the scale of the painting project. The exposed areas might require repairs or preparation work before painting.
- Surface preparation – Assess the condition of the surface beneath the awnings. Removal may reveal uneven textures, holes, or damage that needs to be addressed. Clean the surface thoroughly and make any necessary repairs.
- Paint selection – Choose the appropriate type of paint based on the surface material (wood, metal, masonry) and the exterior conditions it will face (sun exposure, moisture). Consider whether a primer is needed for better adhesion and longevity.
- Equipment and supplies – Determine the necessary tools, including ladders, scaffolding, brushes, rollers, and drop cloths. The size and location of the area to be painted will influence your choices.
- Safety and compliance—Ensure compliance with local regulations regarding exterior painting, especially if you’re working at heights or using specific chemicals. Plan for safety measures to protect yourself and others during the project.
- Budget and timeline – Estimate the cost of materials, disposal, and additional labor required. Set a realistic completion timeline, considering weather conditions and drying times.
The benefits of awning removal before painting

- Provides access to the entire surface—Removing the awnings allows painters to access the entire surface of the building’s exterior, ensuring a more thorough and even coat of paint. This helps achieve a more professional and aesthetically pleasing result.
- Prevents overspray – Painting with the awnings in place can lead to overspray onto the awnings themselves, which can be challenging to clean and may require additional effort to rectify. Removing them eliminates this risk and keeps the awnings looking clean.
- Allows for repairs—Removing the awnings provides an opportunity to inspect them for any damage or wear that may need repairs before painting. This ensures that the awnings are in good condition and can be reinstalled properly after painting.
- Improves durability – Painting directly onto the building’s exterior obstructing the awnings can help ensure better paint adhesion, leading to a more durable and long-lasting finish.
- Enhances aesthetics—Temporarily removing awnings can also allow for more thorough cleaning of the exterior surfaces, improving the overall appearance of the building and providing a fresh canvas for painting.
Planning your project: key considerations
When planning an awning removal and paint project, consider the essential factors below. This will help you effectively manage the project and ensure it is completed safely, within budget, and on schedule.
Timeline
- Start by assessing the painting project timeline. Identify the areas where awnings need to be removed for painting.
- Coordinate with the painting team to schedule the removal of awnings before the painting work begins in each area.
- We plan to reinstall the awnings once the painting work is completed in each area. Coordinate with the painting team to ensure minimal disruption to their work.
Budget
- Gather quotes from contractors for the removal and reinstallation of awnings. Include potential costs for any necessary repairs or maintenance.
- Allocate a specific budget for the awning removal and painting project, factoring in the estimated costs for the removal and reinstallation.
- Set aside a contingency fund to cover unexpected expenses during the awning removal and painting.
Safety
- Train the team responsible for awning removal on proper techniques and safety guidelines. Emphasize the importance of following safety protocols throughout the process.
- Ensure that the team has access to and utilizes appropriate tools for awning removal, such as ladders, safety harnesses, and protective gear.
- Inspect the awnings thoroughly before removal to identify potential safety hazards or structural issues. Address any repairs or maintenance needs before proceeding with the removal process.
A step-by-step guide to coordinating awning removal and painting
1. Preparation phase
Selecting the right tools and equipment for awning removal
- Safety gear (Safety glasses, gloves, and hard hats protect against falling debris and tools)
- Ladder or scaffold
- Drill or screwdriver
- Wrench set
- Utility knife
- Reciprocating saw
- Pry bar
- Rope or straps
Equipment for painting
- Pressure washer
- Paint Scraper and sandpaper
- Drop cloths
- Painters tape
- Paint brushes and rollers
- Extension poles
- Paint tray and liners
- Ladder or scaffold
Protecting landscaping and outdoor features from damage during the process
- Use drop cloths: Spread them over plants, garden beds, and water features to protect from falling debris and paint splatters.
- Cover with plastic sheeting: For larger areas or to protect outdoor furniture, use plastic sheeting secured with tape or weights.
- Temporary fencing: Erecting temporary fencing can keep debris contained and protect larger areas.
- Trimming: Trim any branches or foliage that might interfere with the work area, reducing the risk of damage.
- Pathways: Lay down plywood or boards to create a path for walking or moving equipment, minimizing soil compaction and damage to grass.
- Aftercare: Once the project is completed, gently wash any residue off plants and surfaces with a hose and remove all protective coverings carefully to avoid dragging debris across your landscaping.
2. Awning removal
Removal instructions for different types of awnings
Retractable awnings
- Close the awning: Fully retract the awning to relieve tension on the fabric and arms.
- Disconnect electricity: If your awning is motorized, ensure the power is disconnected to avoid electrical hazards.
- Detach arms: Use a wrench or socket set to detach the arms from the mounting brackets. For motorized models, you might also need to disconnect any electrical connectors.
- Support the weight: Have someone help you support the awning’s weight as you detach it from the mounting hardware.
- Remove mounting hardware: Carefully unscrew or unbolt the awning from the wall or ceiling brackets. Keep all hardware together for reinstallation.
Fixed awnings
- Inspect connections: Check how the awning is attached to the structure—typically, bolts or screws are used.
- Support structure: Ensure the awning is properly supported to prevent it from falling once you remove it.
- Remove fasteners: Use a screwdriver or drill to remove the bolts or screws connecting the awning to the structure.
- Detach awning: With help, gently lower the awning down. Be cautious of any sharp edges or corners.
Motorized awnings
- Cut power supply: Make sure the awning is not connected to any electrical source.
- Retract the awning: If possible, retract it to make handling easier and safer.
- Remove electrical components: Carefully disconnect any wires or electrical components, keeping track of where each part goes.
- Follow the steps for retractable awnings: After dealing with the electrical components, the removal process is similar to that of retractable awnings.
Tips for storage and maintenance
- Cleaning before storage: Clean the awning fabric with mild soap and water and allow it to dry completely to prevent mold and mildew.
- Rolling the fabric: If it is removable, roll it rather than fold it to avoid creases. Store in a dry, cool place.
- Lubricating moving parts: Before storage, lubricate any moving parts with a silicone-based lubricant to keep them in good condition.
- Checking for repairs: Inspect the awning for any signs of wear or damage. Repair any issues before storing to avoid further damage.
- Storage location: Choose a dry, clean area for storage. Avoid places with extreme temperature changes to prevent damage to the fabric and metal components.
- Covering for protection: If possible, place the awning or its components in a protective cover to shield them from dust and pests.
Safety precautions
- Always wear protective gloves and eyewear when handling awnings.
- Work with at least one other person to safely manage the weight and size of the awning.
- Ensure ladders or scaffolding used are stable and securely placed.
3. Exterior painting tips
Best practices for surface preparation and painting
- Clean the surface: Before any painting begins, it’s crucial to clean the exterior surfaces thoroughly. Use a pressure washer to remove dirt, mildew, and peeling paint. This step ensures the new paint adheres properly.
- Scrape and sand: After cleaning, scrape off any remaining loose paint. Then, sand the surface to create a smooth base for the new paint. Sanding helps in promoting better adhesion.
- Repair damages: Inspect the walls for damage or cracks. Use exterior-grade filler to repair holes or cracks, then sand smooth once the filler is dry.
- Prime the surface: Applying a primer is essential, especially for bare wood or metal, stained areas, or when making a significant color change. Primer improves paint adhesion and enhances the durability of the paint job.
- Choose the right time: Paint in mild weather. Extreme temperatures can affect paint drying times and finish quality. Avoid painting in direct sunlight or on rainy days.
- Tape and cover: Use painter’s tape to protect windows, doors, and trim. Drop cloths or plastic sheeting should cover the ground and plants around the house to protect them from paint drips.
Paint types and application methods
1. Paint selection
- Acrylic latex paint – Most experts recommend 100% acrylic latex exterior paint for its durability, flexibility, and ease of cleaning. It’s great for most exterior surfaces, including wood, masonry, and metal.
- Oil-based paint – Suitable for priming wood, including bare or previously painted wood. It offers excellent adhesion and stain sealing but has longer drying times and requires solvent cleanup.
2. Sheen selection
- Flat or matte – Offers a non-reflective finish that hides imperfections but is less durable.
- Satin – Provides a slight gloss with better durability and is suitable for siding.
- Semi-gloss and gloss – Highly durable and easy to clean, ideal for trim, doors, and areas with a lot of wear.
3. Application methods
- Brush—This offers excellent control for detailed areas or smaller projects. Ensure you use brushes suited to your paint type (e.g., synthetic brushes for latex paint).
- Roller – Ideal for large, flat areas. Rollers provide even coverage and a smoother finish than brushes.
- Spray—This method offers the fastest application and can provide a very smooth finish. It is suitable for large projects or uneven surfaces. However, more prep work is required to protect areas from overspray.
Additional tips
- Multiple coats: Apply at least two coats of paint, allowing adequate drying time between coats as specified by the paint manufacturer.
- Quality tools: Invest in high-quality brushes, rollers, and paint. They can significantly affect the finish and longevity of your paint job.
- Safety: Always use protective gear, including masks, gloves, and goggles, especially when sanding or using a sprayer.
Reinstalling your awning
Ensuring the paint is fully cured before reinstallation
- Check paint curing time: Before reattaching the awning, ensure the paint on the walls is fully cured, not just dry. Curing time can vary based on the type of paint used and environmental conditions but generally ranges from a few days to a few weeks.
- Consult the paint can: Refer to the manufacturer’s instructions for the exact curing time.
- Avoid touching the walls: Even if the paint feels dry, it may not be fully cured. This distinction is crucial because attaching the awning to uncured paint could lead to damage or paint peeling.
Step-by-step guide to safely reinstalling your awning
- Gather your tools and hardware: Ensure you have all the necessary tools and hardware before you start. This might include a drill, screws, anchors appropriate for your wall type, a level, a measuring tape, and possibly a helper.
- Inspect the awning and hardware: Before reinstallation, inspect the awning for any damage or wear. Also, check all hardware and replace any rusted or damaged components.
- Mark the wall for bracket placement: If you haven’t done so, measure and mark where the awning brackets will be attached. Use a level to ensure your marks are even and the awning will be level.
- Pre-drill holes (if applicable): Depending on your wall material, you may need to pre-drill holes for the anchors. Use a drill bit that matches the size of your anchors for a snug fit.
- Install the brackets: Attach the awning brackets to the wall using the screws and anchors, ensuring each one is secure and tight. If your awning is heavy, having a helper to hold the brackets while you drill can be very helpful.
- Attach the awning to the brackets: With the brackets securely in place, lift the awning and position it onto the brackets. This step often requires at least two people. Once in position, secure the awning to the brackets according to the manufacturer’s instructions.
- Check for level and adjust if necessary: Once the awning is attached, use a level to ensure it’s perfectly horizontal. Adjust the bracket positions if needed.
- Secure and tighten all components: Go over every screw and bolt to make sure everything is tightly secured. It will ensure your awning is safe and reduces the risk of losing it over time.
- Final inspection: Give your awning a final inspection to ensure it is securely attached and operates smoothly. Check the awning fabric for any signs of stress or pulling that indicate incorrect installation.
Hiring a professional vs. DIY
When to consider hiring professionals
- Complex installations—If your awning is particularly large, high up, or intricately installed, professionals can ensure safe and efficient removal.
- Specialized equipment required – Certain awning materials or installation methods may require specialized tools or equipment that professionals already possess.
- Safety concerns—Working at heights, dealing with heavy materials, or encountering unexpected structural issues can pose significant risks. Professionals are trained to handle such situations safely.
- Quality assurance – For painting, achieving a high-quality, durable finish often requires expertise in surface preparation, paint selection, and application techniques. Professionals guarantee their work, providing peace of mind.
- Time constraints: If you’re on a tight schedule, Professionals can typically complete the job faster than a DIY effort.
DIY tips for awning removal and painting
Awning removal
- Safety first: Wear protective gear, including gloves and safety glasses. For high areas, use a sturdy ladder or scaffolding.
- Check the mechanism: Understand whether your awning is manually operated or motorized. This will affect how you disconnect and remove it.
- Secure assistance: Some awnings are too bulky for one person to handle safely. Enlist a helper to prevent accidents.
- Document the process: Taking photos or notes during disassembly can be invaluable when reinstalling or replacing parts.
Painting
- Surface preparation: Thoroughly clean the awning to remove dirt, mold, and peeling paint. Let it dry completely before painting.
- Choose the right paint: Select a paint designed for outdoor use and compatible with your awning’s material (fabric, metal, etc.).
- Priming (if necessary): Some surfaces may require a primer to ensure better paint adhesion and durability.
- Application: Use brushes, rollers, or a sprayer for an even application. For a smoother finish, consider applying multiple thin coats rather than a single thick one.
- Drying time: Following the manufacturer’s recommendations, allow ample time for the paint to dry between coats.
Maintenance tips for awnings and painted surfaces
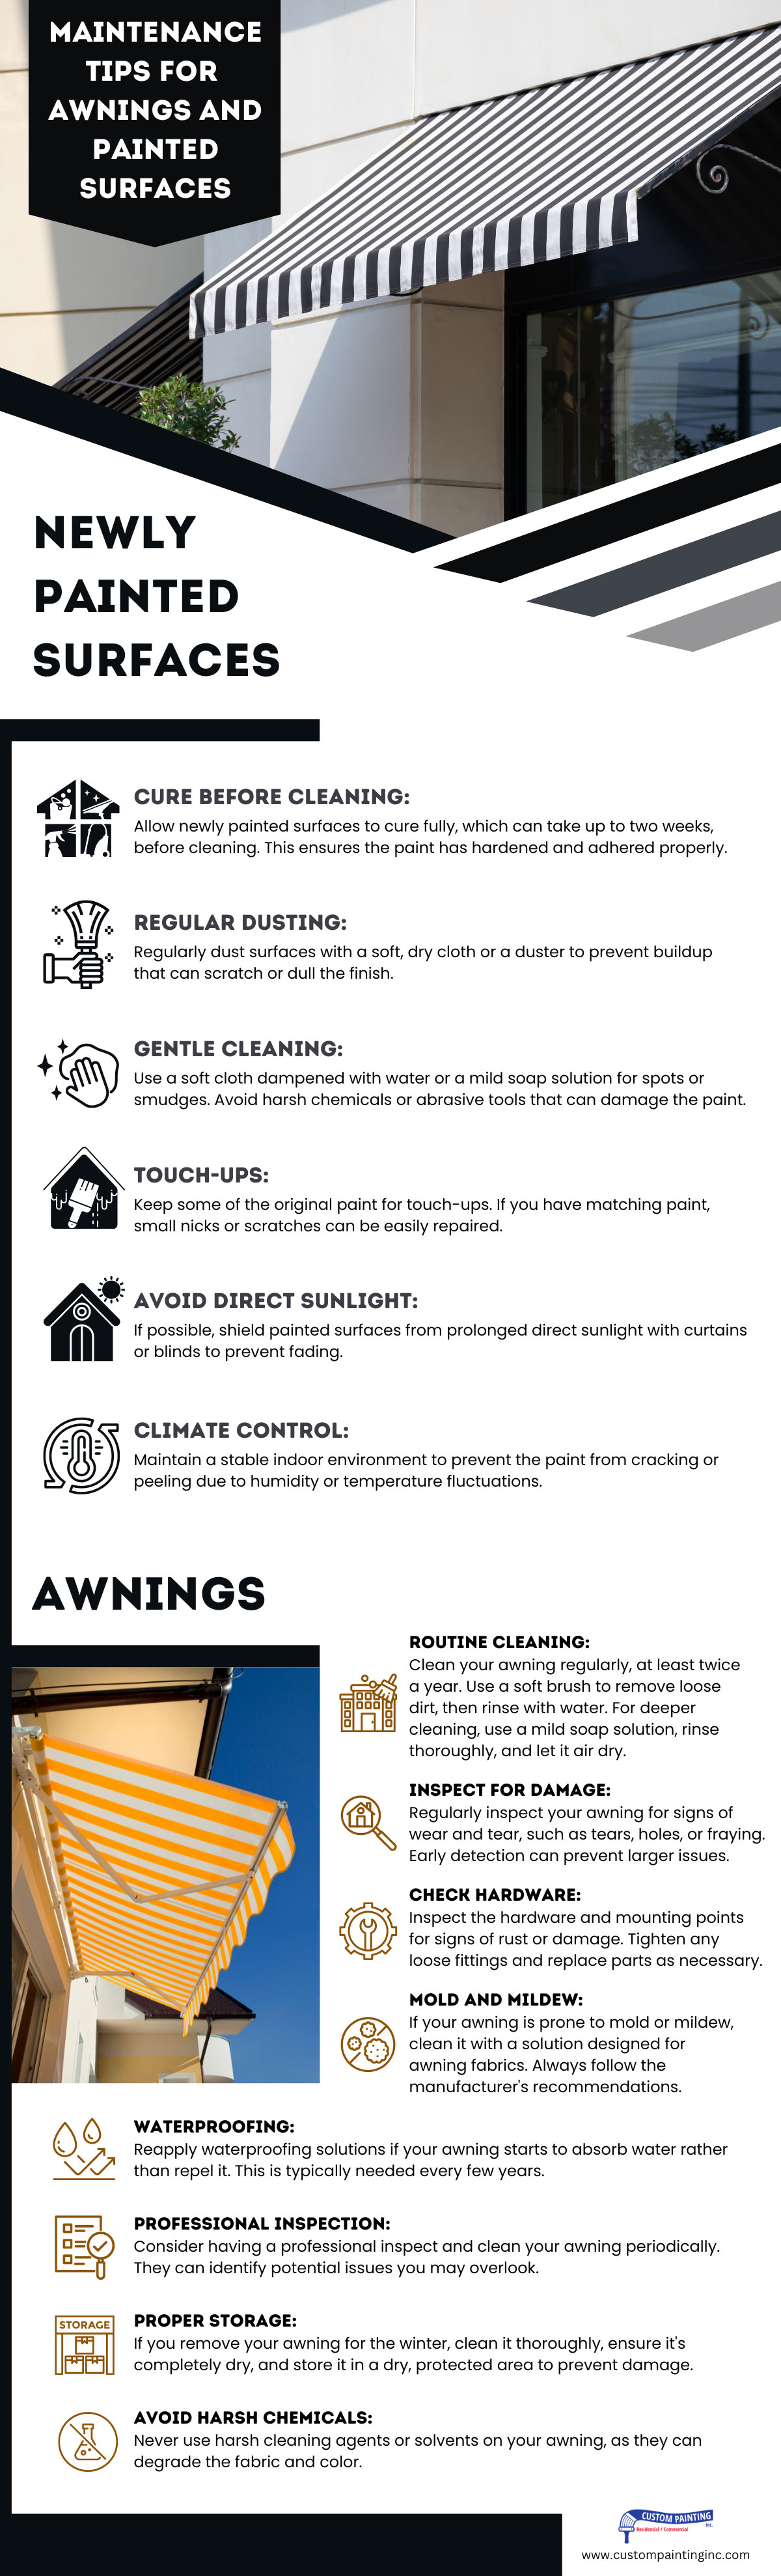
Newly painted surfaces
- Cure before cleaning: Allow newly painted surfaces to cure fully, which can take up to two weeks, before cleaning. This ensures the paint has hardened and adhered properly.
- Regular dusting: Regularly dust surfaces with a soft, dry cloth or a duster to prevent buildup that can scratch or dull the finish.
- Gentle cleaning: Use a soft cloth dampened with water or a mild soap solution for spots or smudges. Avoid harsh chemicals or abrasive tools that can damage the paint.
- Touch-ups: Keep some of the original paint for touch-ups. If you have matching paint, small nicks or scratches can be easily repaired.
- Avoid direct sunlight: If possible, shield painted surfaces from prolonged direct sunlight with curtains or blinds to prevent fading.
- Climate control: Maintain a stable indoor environment to prevent the paint from cracking or peeling due to humidity or temperature fluctuations.
Awnings
- Routine cleaning: Clean your awning regularly, at least twice a year. Use a soft brush to remove loose dirt, then rinse with water. For deeper cleaning, use a mild soap solution, rinse thoroughly, and let it air dry.
- Inspect for damage: Regularly inspect your awning for signs of wear and tear, such as tears, holes, or fraying. Early detection can prevent larger issues.
- Check hardware: Inspect the hardware and mounting points for signs of rust or damage. Tighten any loose fittings and replace parts as necessary.
- Mold and mildew: If your awning is prone to mold or mildew, clean it with a solution designed for awning fabrics. Always follow the manufacturer’s recommendations.
- Waterproofing: Reapply waterproofing solutions if your awning starts to absorb water rather than repel it. This is typically needed every few years.
- Professional inspection: Consider having a professional inspect and clean your awning periodically. They can identify potential issues you may overlook.
- Proper storage: If you remove your awning for the winter, clean it thoroughly, ensure it’s completely dry, and store it in a dry, protected area to prevent damage.
- Avoid harsh chemicals: Never use harsh cleaning agents or solvents on your awning, as they can degrade the fabric and color.
Conclusion
Coordinating awning removal with exterior painting projects is a strategic approach that enhances building maintenance efforts’ quality, efficiency, and aesthetics. It ensures that both tasks are executed with attention to detail, leading to a more durable and visually appealing outcome.
The keys to a successful project are planning, preparation, and execution. Planning your awning removal with your painting project and getting your worksite prepared before starting it will save you time and potentially costly repairs afterward. Always follow safety guidelines when using tools and equipment, and consider consulting with or hiring professionals for particularly challenging projects.
Contact Custom Painting, Inc. today for your next house painting in Livermore project! Schedule a consultation and appointment with us by phone at 925-294-8062 or by filling out this online form for a free estimate.
